
| 일 | 월 | 화 | 수 | 목 | 금 | 토 |
|---|---|---|---|---|---|---|
| 1 | 2 | 3 | 4 | 5 | 6 | 7 |
| 8 | 9 | 10 | 11 | 12 | 13 | 14 |
| 15 | 16 | 17 | 18 | 19 | 20 | 21 |
| 22 | 23 | 24 | 25 | 26 | 27 | 28 |
| 29 | 30 | 31 |
- PuTTYgen
- 라즈베리파이3
- circuitPython
- Private Key
- ubuntu
- x.509
- Raspberry Pi
- W5500
- micropython
- IoT Central
- openssl
- thonny
- Ethernet
- Azure
- nodejs
- Python
- PIR
- vscode
- raspberrypi
- Linux
- w5500-evb-pico
- WIZnet
- putty
- W5100S
- RP2040
- SSH
- aws
- ChatGPT
- adafruitio
- W5100S-EVB-Pico
- Today
- Total
Develop Note
ChatGPT API를 사용하여 유용한 이메일 자동 전송하기 (with W5100S-EVB-Pico, Micropython) 본문
ChatGPT API를 사용하여 유용한 이메일 자동 전송하기 (with W5100S-EVB-Pico, Micropython)
Chalsu 2023. 3. 17. 15:41Introduction
이번 포스팅에서는 W5100S-EVB-Pico 보드 환경에서 ChatGPT API와 SendGrid를 활용하여 이메일을 전송하는 방법에 대해 다룬다.
먼저 PC 환경에서 Python을 이용한 ChatGPT API를 사용해 보고, 이어서 W5100S-EVB-Pico 보드 환경에서 Micropython과 urequests를 활용하여 Sendgrid를 사용해 이메일을 보내는 과정을 정리한다.
주제는 유용한 이메일로 활기찬 하루를 보내기: W5100S-EVB-Pico로 ChatGPT API 실행 이다. ChatGPT가 추천해준 제목이다.
사전 준비
- OpenAI 계정
- API key 생성
- Key는 공개되지 않도록 주의한다.
- SendGrid 계정
- Windows PC
- W5100S-EVB-Pico
- Thonny: for Micropython
Step 1: PC 환경에서 Python으로 ChatGPT API 사용
첫 번째 단계는 PC 환경에서 Python으로 ChatGPT API를 사용하는 것이다.
API를 사용할 때 라이브러리를 사용하거나 요청을 사용하는 두 가지 방법이 있는데, 라이브러리 메서드를 사용하려면 Python 패키지를 설치해야 하고 HTTP 요청을 사용하려면 API 엔드포인트로 HTTP 요청을 보내면 된다.
라이브러리를 사용하여 chatGPT API를 사용하려면 먼저 패키지를 설치해야 한다.
pip 명령을 사용하여 패키지를 설치한다.
pip install openai패키지를 설치한 후 Python 코드에서 패키지를 가져오고 다음 코드를 사용하여 API 키를 인증할 수 있다.
import openai
openai.api_key = "YOUR_API_KEY"
ChatGPT에게 Python으로 ChatGPT API 사용하는 방법에 물어보면 샘플 코드를 주는데, 최신 모델(gpt-3.5-turbo)이 아닌 이전의 텍스트 기반 모델 코드를 알려준다.
다시 요청해도 같은 코드를 주는 걸 보면, gpt-3.5-turbo는 최근 출시되었으니 아직 정보가 학습되지 않아 그런 것 같다.


하지만 공식 문서에 잘 설명되어 있으니, 가이드 문서를 참조하여 진행하면 된다.
다음과 같이 샘플 코드를 변경하여 테스트 했다. 환경변수를 사용하기 위해 dotenv 패키지를 사용했다.
import openai
import os
import dotenv
dotenv.load_dotenv()

openai.api_key = os.environ.get('OPEN_API_KEY')
msg = "Hello, how are you?"

response = openai.ChatCompletion.create(
    model="gpt-3.5-turbo",
    messages=[{"role": "user", "content": msg}]
)

print(response)
print(response.choices[0].message.content)
Step 2: Using the chatGPT API using Micropython in the W5100S-EVB-Pico board environment using urequests
PC 환경에서 chatGPT API를 성공적으로 사용했다면 다음 단계는 W5100S-EVB-Pico 보드의 Micropython 환경에서 사용하는 것이다. 이를 위해 urequests 라이브러리를 사용하여 HTTP 요청을 ChatGPT API 엔드포인트로 전송한다.
마찬가지로 API 사용방법은 OpenAI의 공식 문서에 친절하게 설명되어 있다.
PC에서 API 테스트
import requests
import json
import os
import dotenv
dotenv.load_dotenv()

api_key = os.environ.get('OPEN_API_KEY')
url = "https://api.openai.com/v1/chat/completions"

msg = "Hello, how are you?"

headers = {"Authorization": f"Bearer {api_key}", "Content-Type": "application/json"}
data = {
    "model": "gpt-3.5-turbo",
    "messages": [{"role": "user", "content": msg}]
}

response = requests.post(url, headers=headers, data=json.dumps(data))
print(response)

if response.status_code == 200:
    response_data = json.loads(response.text)
    body = response_data["choices"][0]["message"]["content"]
    print(body)
else:
    print("Error:", response.text)
응답은 다음과 같다.
$ python apiTest.py
{
  "choices": [
    {
      "finish_reason": "stop",
      "index": 0,
      "message": {
        "content": "\n\nAs an AI language model, I do not have feelings like humans do. However, I am functioning properly and ready to assist you with any queries or tasks that you may have. How may I assist you today?",
        "role": "assistant"
      }
    }
  ],
  "created": 1678856384,
  "id": "chatcmpl-6uDWioNIOAZ6At8tQT4AT7rFsFPpE",
  "model": "gpt-3.5-turbo-0301",
  "object": "chat.completion",
  "usage": {
    "completion_tokens": 44,
    "prompt_tokens": 13,
    "total_tokens": 57
  }
}
W5100S-EVB-Pico를 환경에서 구현하기
다음으로, W5100S-EVB-Pico 환경에서 Micropython으로 같은 기능을 사용하는 코드를 작성했다. 차이점은 다음과 같다.
- 이더넷 초기화 코드 사용
- urequests 사용 (upip로 설치)
- 우선, dotenv를 사용하지 않고 하드 코딩했다. 추후 보완할 예정이다.
from machine import Pin, SPI
import network
import utime
import urequests
import json

# W5x00 init
def init_ethernet():
    spi = SPI(0, 2_000_000, mosi=Pin(19), miso=Pin(16), sck=Pin(18))
    nic = network.WIZNET5K(spi, Pin(17), Pin(20))   # spi, cs, reset pin
    # Using DHCP
    nic.active(True)
    while not nic.isconnected():
        utime.sleep(1)
        # print(nic.regs())
        print('Connecting ethernet...')

    print(f'Ethernet connected. IP: {nic.ifconfig()}')


def gpt_main():
    init_ethernet()

    api_key = "<API_KEY>"
    url = "https://api.openai.com/v1/chat/completions"
    msg = "Hello, how are you?"

    headers = {"Authorization": f"Bearer {api_key}", "Content-Type": "application/json"}
    data = {
        "model": "gpt-3.5-turbo",
        "messages": [{"role": "user", "content": msg}]
    }

    response = urequests.post(url, headers=headers, data=json.dumps(data))

    if response.status_code == 200:
        response_data = json.loads(response.text)
        # print('response_data:', response_data)
        body = response_data["choices"][0]["message"]["content"]
        print(body)
    else:
        print("Error:", response.text)


gpt_main()
Step 3: Send Email using SendGrid with Python requests
ChatGPT API를 사용하여 메시지 콘텐츠를 생성한 후 다음 단계는 메시지를 사용자의 이메일로 보내는 것이다. 이를 위해 이메일 전송을 위한 RESTful API를 제공하는 이메일 서비스 제공업체인 SendGrid를 사용할 수 있다.
SendGrid API를 시작하려면 웹사이트에서 계정을 만들고 API 키를 받아야 한다. 그런 다음 이 API 키를 사용하여 SendGrid API에 대한 요청을 인증할 수 있다.
Sendgrid 무료 계정으로 매일 100개의 이메일을 무료로 보낼 수 있다.


API 키를 받으면 Python 스크립트를 만들어 이메일을 보낼 수 있다. request 본문에 수신자 이메일 주소, 제목 및 메시지 내용을 제공해야 한다. 또한 API 키를 포함하도록 "Authorization" 헤더를 설정해야 한다.
다음은 ChatGPT가 제시해준 SendGrid API를 HTTP request 방식으로 사용하는 방법에 대한 Python 코드 스니펫이다.
import requests

sg_api_key = "YOUR_SENDGRID_API_KEY"
sg_url = "https://api.sendgrid.com/v3/mail/send"

# Recipient email address
to_email = "recipient@example.com"

# Email subject
subject = "Your daily dose of inspiration"

# Message content
message = "Hello, this is your daily dose of inspiration. Keep going and never give up!"

# Create request body
data = {
    "personalizations": [{
        "to": [{"email": to_email}],
        "subject": subject
    }],
    "from": {"email": "sender@example.com"},
    "content": [{
        "type": "text/plain",
        "value": message
    }]
}

# Create request headers with API key
headers = {
    "Authorization": f"Bearer {sg_api_key}",
    "Content-Type": "application/json"
}

# Send email using SendGrid API
response = requests.post(sg_url, headers=headers, json=data)

if response.status_code == 202:
    print("Email sent successfully!")
else:
    print(f"Error sending email: {response.text}")
이 스크립트는 제공된 제목 및 메시지 내용과 함께 수신자 이메일 주소로 일반 텍스트 이메일을 전송한다. 이메일이 성공적으로 전송되면 스크립트는 성공 메시지를 출력하고, 그렇지 않으면 응답 텍스트와 함께 오류 메시지를 출력한다.
Step 4: Writing and Testing Application Prompts
다음으로, Step 2, 3에서 작성했던 코드를 병합하여, ChatGPT로부터 받은 답변을 이메일로 보내도록 작성했다.
ChatGPT API에 요청하여 받은 응답을, SendGrid API 본문에 추가해주면 된다.
이 부분에서 시간이 좀 걸렸는데, ChatGPT 웹을 통해 보여지는 내용과 이메일로 전송되는 본문 모양이 달라졌기 때문이다.
내용과 관계없이 메일에서 보여질 형태를 고려하다보니 여러번 테스트가 필요했고, 프롬프트에 HTML 형태로 요청하는 부분을 추가했다.
...으로 표시된 부분은 이전 스텝과 같은 코드라 생략한 부분이다.
# ...

def gpt_main():
    init_ethernet()
    # ...

    if response.status_code == 200:
        response_data = json.loads(response.text)
        body = response_data["choices"][0]["message"]["content"]
        # ...

        headers = {"Authorization": f"Bearer {sg_api_key}", "Content-Type": "application/json"}
        resp = urequests.post(sendgrid_endpoint, headers=headers, data=json.dumps(data).encode('utf-8'))
        # ...

gpt_main()
아래는 프롬프트에 적용된 사항이다.
Unsplash 사용
메일에 이미지를 넣고 싶어서 프롬프트 내에 Unsplash URL를 사용했다. 키워드를 넣으면 그에 대한 랜덤한 이미지를 얻을 수 있다.
관련 내용은 ChatGPTers 사이트 글에서 참조했다.
HTML 태그로 변환
프롬프트의 끝 부분에 아래 문구를 추가해서, 이메일을 전송할 때 HTML로 변환된 코드를 전송할 수 있게 만들었다.
Finally, convert the text (written in markdown) to html format. Apply a style that makes the font size 18px.
일반 텍스트로 보낼 때보다는 좀 더 보기좋게 나온다. 좀 더 테스트가 필요하다.
Fianl Step: 특정 시간마다 GhatGPT로 이메일 작성해서 보내기
마지막으로, 시간 정보를 사용하여 매일 특정한 시간에 메일을 보내도록 설정했다.
# ...
while True:
    # Get the current time
    current_hour = time.localtime()[3]
    current_minute = time.localtime()[4]

    # Check if it's time to send the messag
    if current_hour == 9 and current_minute == 0:
        gpt_main(morning_subject, morning_msg)
    elif current_minute == 10:
        gpt_main(english_subject, english_msg)

    print(f'Current Time: {get_current_time()}')
    time.sleep(60)

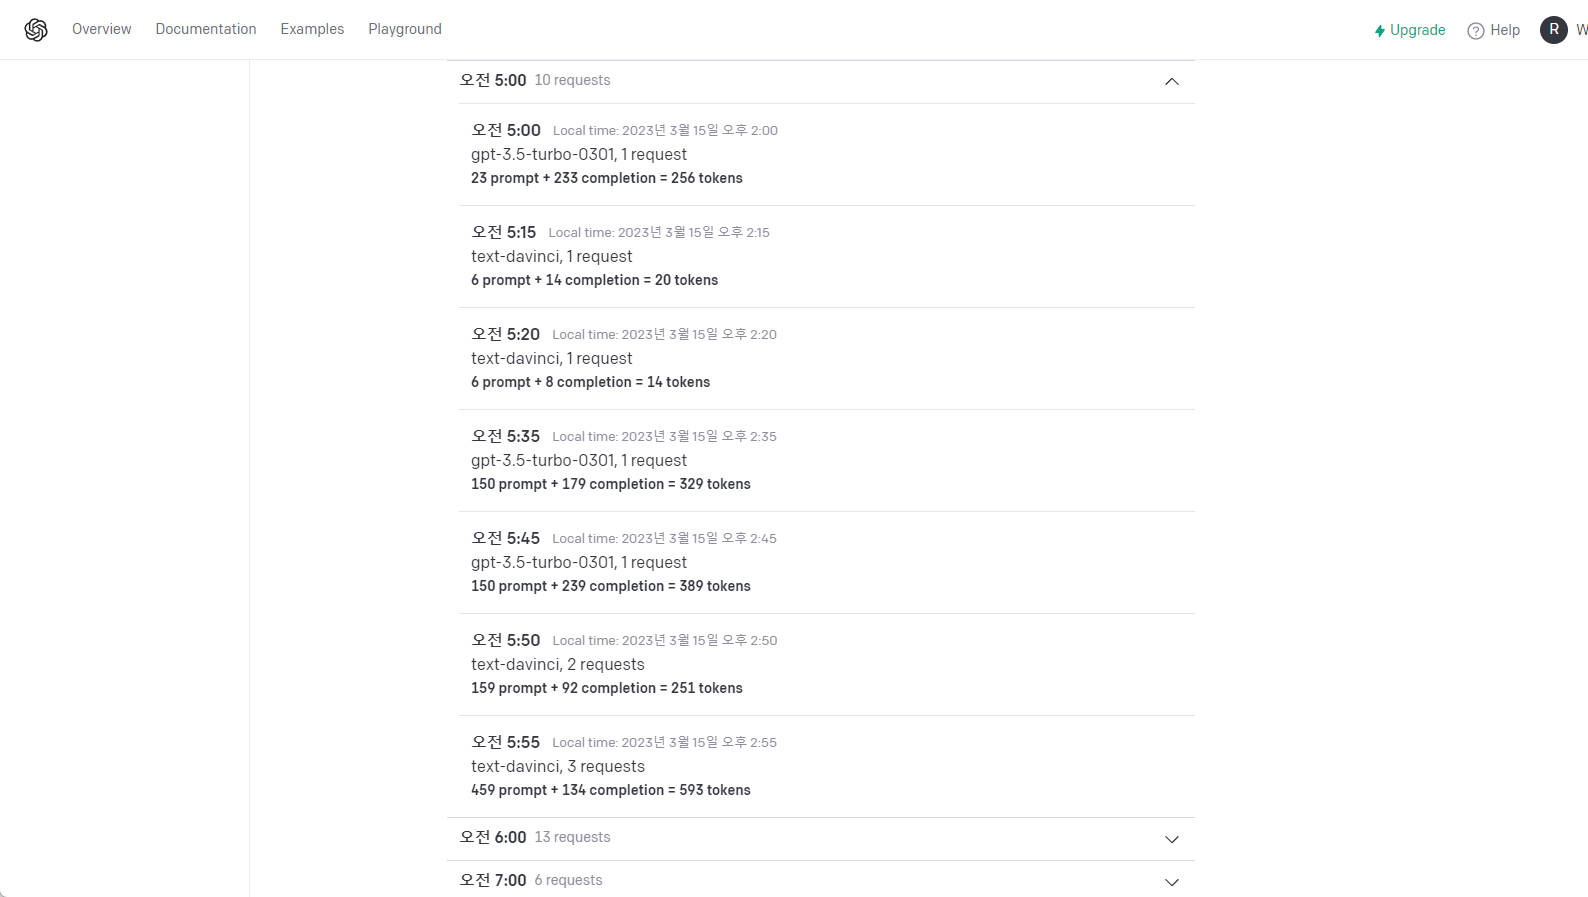
Check Usage
OpenAI 계정 설정 화면에서, 무료 크레딧을 얼마나 사용했는지 확인해 봤다.
아직 1달러도 사용하지 못했다. 6월 1일까지만 사용할 수 있으니 틈날 때 부지런히 테스트를 해봐야겠다.

Conclusion
여러 번의 프롬프트를 시도한 끝에, 다음과 같은 결과물을 얻었고 기능은 다음과 같다.
- W5100S-EVB-Pico 보드 환경에서 Micropython을 사용하여 ChatGPT API와 SendGrid API 사용
- 2개의 프롬프트 사용
- 영어 단어
- 오전시간에 힘을 주는 글
- 하나는 매일 오전 9시, 다른 하나는 매 시간마다 실행되도록 설정
- 2개의 프롬프트 사용
각각 이메일은 다음과 같이 수신된다.


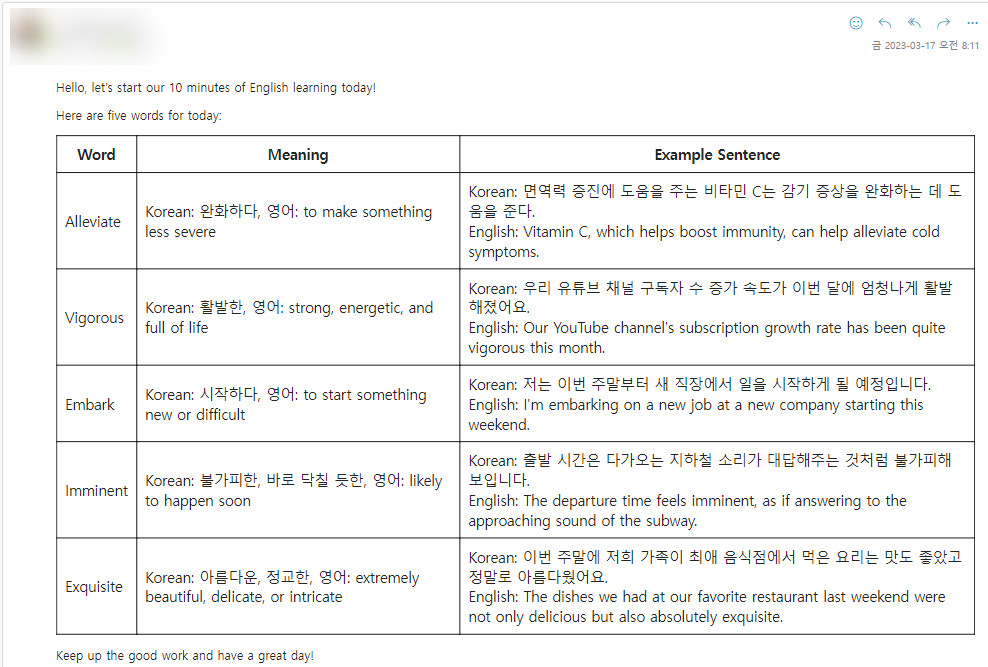

...
확실히 어떻게 질문하고 요청하느냐에 따라 결과물이 달라지기 때문에, 이에 대한 감이 필요하고 많은 시도가 필요할 것 같다.
그리고 어느정도 익숙해지면 많은 재밌는 것들을 해볼 수 있지 않을까 싶다.
다음 스텝은 크게 이 정도가 있을 것 같고 아직 뭘 할지는 모르겠지만, 계속 관심을 가지고 진행해 봐야겠다.
- 더 유용한 결과물을 얻을 수 있는 프롬프트 작성
- 이메일 외에 슬랙이나 노션 등 다른 플랫폼 사용
- 이미지 등 다른 OpenAI API 모델 사용


Reference
- WIZnet W5100S-EVB-Pico board: https://www.wiznet.io/product-item/w5100s-evb-pico/
- OpenAI GPT: https://platform.openai.com/docs/introduction
- SendGrid: https://sendgrid.com/
- Micropython: https://micropython.org/
'개발 (Ko)' 카테고리의 다른 글
| ChatGPT API와 Tistory: 자동화된 영어 학습 블로그 만들기 (0) | 2023.06.22 |
|---|---|
| W5100S-EVB-Pico에서 ChatGPT와 Slack API를 활용한 영어공부 Bot 만들기 (0) | 2023.04.19 |
| Azure IoT X.509 인증을 위한 인증서 생성 (0) | 2022.12.16 |
| AWS EC2에 SSH로 접속하기 (with PuTTY) (0) | 2022.12.16 |
| PuTTY SSH 접속을 위한 Private key 파일 변환 (.pem -> .ppk) (0) | 2022.12.16 |


